Wednesday, November 13, 2024

Wooden Candle Holder Ideas to Create a Cozy Ambience in Your Home

Wooden Candle Holder Ideas to Create a Cozy Ambience in Your Home

Bring the Warmth Home with Wooden Candle Holders: Cozy Up Your Space

Candles, with their flickering flames and warm glow, have a magical ability to transform any space into a cozy haven. And what better way to enhance that ambiance than with a stunning wooden candle holder? Wood, with its natural beauty and rustic charm, adds a touch of warmth and sophistication to any décor.

Whether you're a seasoned DIY enthusiast or a beginner looking to add a personal touch to your home, creating wooden candle holders is a fun and rewarding project. Let's dive into some inspiring ideas to create a cozy and welcoming atmosphere in your home.

Rustic Elegance: Embracing the Natural Beauty of Wood

For a truly rustic and inviting feel, embrace the raw beauty of wood in its natural state. Here are a few ideas to get you started:

Driftwood Delight

Driftwood, with its unique shapes and weathered textures, is a perfect material for creating a one-of-a-kind candle holder. Simply gather some driftwood pieces from your beach trips or find them at a local craft store. Secure a small tea light or votive candle to the wood using glue or a small nail. The rustic charm of driftwood will complement any beach-themed or coastal décor.

Log Candle Holders

Thick slices of log, preferably with interesting knots or grain patterns, make stunning candle holders. You can create a simple holder by drilling a hole in the center of the log to accommodate your candle. Alternatively, you can carve a shallow depression in the log to create a more decorative holder. The rough-hewn texture of the log adds a touch of rustic charm and warmth.

Tree Branch Candle Holders

Embrace the natural beauty of branches by transforming them into decorative candle holders. Look for branches with interesting shapes and textures. You can simply place a candle on a branch or use a small piece of wire or string to secure it in place. For a more polished look, you can sand the branch and give it a natural oil finish.

Personalized Wooden Candle Holders: Adding a Touch of Your Style

Add a personal touch to your candle holders by incorporating your own creative flair. Experiment with different stains, paints, and embellishments to create unique pieces that reflect your individual style.

Painted Wooden Candle Holders

Paint your wooden candle holders in vibrant hues to add a pop of color to your home. Choose colors that complement your existing décor or create a thematic look. For example, a vibrant blue candle holder can enhance a beachy atmosphere, while a warm red holder can add a festive touch.

Stained Wooden Candle Holders

Enhance the natural beauty of wood with a stain. Choose from a variety of wood stains to achieve different looks. For a warm and inviting feel, opt for honey or walnut stains. If you prefer a darker and more dramatic look, try a mahogany or ebony stain.

Embellished Wooden Candle Holders

Add unique details to your wooden candle holders by using different embellishments. Here are a few ideas:

  • **Stencils:** Create intricate patterns on your candle holder using stencils. You can use stencils to add floral motifs, geometric shapes, or inspirational quotes.
  • **Decoupage:** Glue beautiful paper cutouts or fabric scraps onto your candle holders for a unique and whimsical look. This technique is a great way to repurpose old paper or fabric scraps.
  • **Natural Elements:** Incorporate natural elements like dried flowers, pine cones, or seashells for a touch of rustic charm. Secure them to the holder with glue or wire.

Creative Wooden Candle Holder Designs: Beyond the Basic

Get inspired by these creative designs to elevate your candle holder creations:

Tiered Wooden Candle Holders

Create a stunning centerpiece by stacking wooden platforms to create a tiered candle holder. This design allows you to display multiple candles at different heights, adding depth and dimension to your space. You can use different sizes and shapes of wood for a visually interesting look.

Wooden Candle Lanterns

Build a cozy wooden lantern to create a warm and inviting glow. Use thin wooden slats to create a frame, then use glass or wire mesh for the sides to allow the candlelight to shine through. Decorate the lantern with wood carvings or paint for a personalized touch.

Wooden Candle Holders with Built-in Shelves

Create a practical and stylish candle holder by adding shelves for displaying small decorative items. This design allows you to combine a cozy candlelight with a touch of decorative flair. You can use thin wooden planks or repurposed pieces of wood to build the shelves.

Tips for Creating Wooden Candle Holders

To ensure your wooden candle holder is safe and aesthetically pleasing, keep these tips in mind:

  • Choose the Right Wood: Select sturdy and fire-resistant woods like oak, maple, or walnut. Avoid using soft woods that could easily catch fire.
  • Securely Mount the Candle: Make sure the candle is firmly secured to the holder. Use glue, wire, or a small nail to prevent it from tipping over.
  • Always Supervise Burning Candles: Never leave burning candles unattended. Always use a heat-resistant surface and place the holder away from flammable materials.
  • Finish the Wood: Sand the wood smooth and apply a sealant or varnish to protect it from heat and moisture.

Conclusion: Adding a Touch of Warmth and Charm to Your Home

Wooden candle holders are a wonderful way to add a touch of warmth, charm, and personality to your home. With a little creativity and some basic woodworking skills, you can transform plain wood into stunning candle holders that will create a cozy and welcoming atmosphere in any space.

So, gather your tools and materials, and let your imagination run wild. You'll be surprised at the unique and beautiful candle holders you can create to enhance the warmth and ambiance of your home!

Profitable Wooden Bench Ideas for Beginners to Build and Sell

Profitable Wooden Bench Ideas for Beginners to Build and Sell

Profitable Wooden Bench Ideas for Beginners to Build and Sell

Hey there, fellow woodworking enthusiast! Are you looking for a fun and profitable project to tackle? Look no further than building and selling wooden benches! They’re a timeless piece of furniture that everyone needs, and they can be customized to fit any style.

Why Wooden Benches?

Let’s break down why building and selling wooden benches is a great idea for beginners:

High Demand:

Benches are a staple in homes, gardens, and public spaces. They are versatile and practical, perfect for seating, storage, and adding a touch of charm to any setting.

Relatively Easy to Build:

Even if you’re a beginner, many bench designs are straightforward to build. You don’t need a ton of fancy tools or skills to get started. With a few basic tools and some patience, you can craft a beautiful bench.

Profit Potential:

Wooden benches can be priced competitively, allowing you to earn a good profit margin. Plus, you can upsell your creations by offering customizations like different wood types, finishes, and sizes.

Popular Wooden Bench Ideas for Beginners

Now, let’s dive into some popular and profitable bench ideas perfect for beginner woodworkers:

Classic Garden Bench:

This timeless design is a crowd-pleaser. It’s typically made with simple straight lines, creating a classic and elegant look. You can use sturdy wood like cedar or redwood for a natural and durable finish.

Modern Outdoor Bench:

Embrace minimalist aesthetics with a modern outdoor bench. Think clean lines, sleek designs, and maybe even some metal accents. You can use wood like teak or walnut for a more contemporary feel.

Storage Bench:

This versatile bench offers both seating and storage. You can build it with a hinged seat that lifts up to reveal a compartment for blankets, cushions, or even tools.

Indoor Bench:

Don’t limit yourself to outdoor designs! Indoor benches can provide extra seating in your living room, hallway, or entryway. Choose wood species like oak or maple for a warm and elegant look.

Essential Tips for Success

Here are some essential tips to ensure your bench-building venture is a success:

Start Small:

Don’t try to tackle a complex design right away. Begin with simpler projects to build your confidence and skills.

Use High-Quality Materials:

Invest in durable wood that will withstand the elements (if you’re building an outdoor bench) and last for years.

Pay Attention to Detail:

Precise cuts, smooth finishes, and sturdy construction will make a big difference in the overall quality and appeal of your benches.

Learn the Basics of Woodworking:

There are countless resources available online and in libraries to teach you the fundamental techniques. Don’t be afraid to experiment!

Market Your Benches:

Once you’ve built some beautiful benches, it’s time to sell them! Create a portfolio of your work, set up an online store (Etsy, Facebook Marketplace, or your own website), or sell at local craft fairs.

Price Competitively:

Research the prices of similar benches to get a good sense of what people are willing to pay. Consider the cost of materials, your time, and any additional services you’re offering.

Unlocking the Potential of Wooden Benches

Remember, building and selling wooden benches is more than just a woodworking project; it’s a creative endeavor that allows you to express your unique style and connect with others.

Customization Options:

Take your benches to the next level by offering customization options. Here are some ideas:

  • Different wood types and finishes
  • Custom dimensions
  • Inlays and carvings
  • Unique seating designs
  • Added storage compartments

Build a Brand:

Develop a distinct brand identity to stand out from the competition. Consider a name, logo, and even a unique selling proposition that sets you apart.

Connect with Your Customers:

Build relationships with your customers by providing excellent service and creating a positive experience. Responding to inquiries promptly, offering personalized recommendations, and being open to feedback will go a long way.

Ready to Build Your Bench Business?

Armed with these ideas and tips, you’re well on your way to launching your profitable wooden bench business. Embrace the journey, have fun with the process, and let your creativity shine through in every piece you create!

Easy Wood Projects Perfect for New Woodworkers

Easy Wood Projects Perfect for New Woodworkers

Easy Wood Projects Perfect for New Woodworkers

Embarking on the journey of woodworking can be both exhilarating and intimidating. The sheer variety of tools, techniques, and materials can seem overwhelming for beginners. However, fear not! There are numerous easy wood projects that are perfectly suited for novice woodworkers, providing a gentle introduction to the craft and a sense of accomplishment.

Simple and Satisfying Projects for Beginners

These projects are designed to be approachable, requiring minimal tools and skill, allowing you to gain confidence and familiarity with basic woodworking techniques.

1. Coasters

Coasters are a fantastic starting point as they are small, quick to make, and require only basic cutting and sanding skills. Choose a hardwood like maple or cherry for durability and a beautiful finish.

  • Cut square or round pieces of wood to your desired size.
  • Sand the edges and surfaces smooth.
  • Apply a finish, such as oil or polyurethane, for protection and a polished look.

2. Wooden Spoons

Carving wooden spoons is a fun and rewarding project that allows you to explore the art of hand-tool woodworking. Softwoods like basswood or butternut are ideal for beginners due to their ease of carving.

  • Use a carving knife or a spoon carving kit to shape the wood into a spoon form.
  • Sand the spoon smooth and round the edges.
  • Apply a food-safe finish, such as mineral oil or beeswax, for protection and a natural sheen.

3. Cutting Boards

Cutting boards are practical and stylish additions to any kitchen. Choose a hardwood like maple, walnut, or cherry for its durability and resistance to knife marks.

  • Cut the wood to the desired size and shape.
  • Sand the surfaces smooth, paying special attention to the edges.
  • Apply a food-safe finish to protect the wood and prevent bacteria growth.

4. Picture Frames

Picture frames provide an opportunity to personalize your home decor. Choose a simple design and wood that complements your photos and furniture.

  • Cut the wood pieces to the required dimensions for the frame.
  • Join the pieces together using wood glue and clamps or miter joints.
  • Sand the frame smooth and apply a finish to enhance its beauty.

5. Birdhouses

Birdhouses are a delightful way to attract feathered friends to your garden. Select a basic design and use cedar or pine for its resistance to moisture and decay.

  • Cut the wood pieces according to the birdhouse plans.
  • Assemble the pieces using wood glue and nails or screws.
  • Paint or stain the birdhouse to blend with your garden.

Essential Tools for New Woodworkers

To get started with these beginner-friendly projects, you'll need a few essential tools. Start with the basics and gradually expand your collection as your woodworking skills grow.

  • Handsaw: A handsaw is a versatile tool for cutting wood to size.
  • Measuring Tape: A reliable measuring tape is crucial for ensuring accurate cuts and measurements.
  • Screwdriver: A screwdriver set with various sizes of Phillips and flathead bits is essential for assembling projects.
  • Wood Glue: A high-quality wood glue is essential for bonding wood pieces together.
  • Clamps: Clamps are used to hold wood pieces together while glue dries or during assembly.
  • Sandpaper: Sandpaper in various grits is used to smooth wood surfaces and remove imperfections.
  • Safety Glasses: Protect your eyes from flying debris while working with wood.

Safety First

Woodworking can be a rewarding and enjoyable hobby, but safety should always be a top priority. Here are some essential safety tips to follow:

  • Always wear safety glasses to protect your eyes from flying debris.
  • Use sharp and well-maintained tools to prevent accidents.
  • Work in a well-ventilated area to avoid inhaling sawdust.
  • Keep your work area clean and organized to minimize tripping hazards.
  • Use proper lifting techniques to avoid back strain.
  • Never leave sharp tools unattended.
  • Be aware of your surroundings and take breaks when needed.

Tips for Success

Here are some additional tips for success as a new woodworker:

  • Start Small: Begin with simple projects to build confidence and basic skills.
  • Plan Ahead: Carefully review plans before starting a project to ensure you have the necessary materials and tools.
  • Practice Makes Perfect: The more you work with wood, the better you'll become at it. Don't be discouraged if your first projects aren't perfect.
  • Join a Woodworking Community: Connect with other woodworkers, share your projects, and learn from their experience. Local woodworking clubs or online forums can be invaluable resources.

Woodworking is a rewarding and enjoyable hobby that can provide a sense of accomplishment and create beautiful and functional pieces. With a little patience, persistence, and these easy wood projects, you can embark on your woodworking journey with confidence and success.

Quick Woodworking Projects to Kickstart Your Skills

Quick Woodworking Projects to Kickstart Your Skills

Quick Woodworking Projects to Kickstart Your Skills

Hey there, wood-loving friend! So you're itching to get your hands dirty and build something amazing, but the thought of a full-blown woodworking project feels overwhelming. Don't worry, we've all been there. That's why we're here to help you kickstart your skills with a few quick and easy projects that'll have you feeling like a woodworking pro in no time.

These projects are perfect for beginners, requiring minimal tools and time, but they'll give you a solid foundation in basic woodworking techniques. Plus, they're super satisfying to complete! So grab your saw, hammer, and a good attitude, and let's dive in.

Easy and Satisfying: Projects You Can Tackle Today

We're starting with a bunch of simple projects that can be tackled in a single afternoon. Think of them as the perfect way to get your feet wet and test the waters of woodworking.

1. Coasters: A Beginner’s Delight

Let's start with something small and practical: coasters! These little beauties are perfect for showcasing your woodworking skills without demanding too much time or effort.

  • Materials: You'll need scrap wood, sandpaper, wood glue, and a finish of your choice (like varnish or polyurethane).
  • Tools: A saw, a drill with a 1/4-inch bit, and a sanding block.

First, cut your wood into squares or circles. Then, sand the edges smooth and apply a coat of finish. That's it! You now have a set of personalized coasters that'll protect your furniture from those pesky condensation rings.

2. Simple Wooden Boxes: A Touch of Elegance

Wooden boxes can be used for everything from storing jewelry to organizing your desk. They're surprisingly easy to make, and the result will look fantastic on your shelf.

  • Materials: You'll need a few pieces of wood (think plywood or pine), a ruler, a pencil, a saw, a drill, a screwdriver, hinges, and a finish.
  • Tools: You'll need a saw to cut the wood to size, a drill to make holes for the hinges, and a screwdriver to attach the hinges.

The key here is precise measurements and clean cuts. Cut your wood into rectangles, drill holes for the hinges, and attach them securely. Then, add a lid and a finish â€" you've now created a beautiful, handmade box!

3. Rustic Wall Shelves: Add Some Charm to Your Home

Looking to create a cozy corner in your home? Rustic wall shelves are a fantastic way to add character and display your favorite trinkets.

  • Materials: You'll need a few wooden boards, brackets (or you can make your own!), screws, and a stain or finish.
  • Tools: A saw, a drill, a screwdriver, and a measuring tape.

Cut the wooden boards to your desired length and width, and attach them to the wall using brackets. Then, stain or finish the shelves to create a rustic, weathered look. Voila! You've got a beautiful and practical addition to your home.

Boost Your Skills: Projects That Take It Up a Notch

Now that you've conquered the basics, let's move on to projects that will challenge you a bit more and help you develop your woodworking skills. Don't worry; they're still totally doable for beginners, and the satisfaction of completing them will be even greater.

4. Wooden Picture Frames: A Personal Touch

Want to give your favorite photos a special touch? Building your own picture frames is a rewarding project that lets you express your creativity.

  • Materials: You'll need wood strips (think oak or walnut), a miter saw, glue, and a finish.
  • Tools: A miter saw (or a handsaw if you're feeling extra patient!), a pencil, a ruler, and a sanding block.

The key here is making accurate miter cuts â€" that's where the miter saw comes in handy! Cut the wood strips at 45-degree angles, then glue them together to form a frame. Once the glue dries, sand the edges and apply a finish. Now you've got a custom frame that's ready to showcase your memories.

5. Cutting Boards: A Kitchen Essential

Cutting boards are essential for any kitchen, and making your own allows you to choose the perfect wood and design. It's a great project for learning how to use different joinery techniques.

  • Materials: You'll need a piece of hardwood (like maple or walnut), a router, a table saw, and a finish.
  • Tools: A table saw, a router, a sander, and a measuring tape.

This project will challenge you with cutting accurate pieces, using a router to round the edges, and joining the pieces together. But the satisfaction of creating a beautiful and functional cutting board is well worth the effort!

6. Simple Birdhouses: Attract Feathered Friends

Birdhouses are a fun and rewarding project that combines woodworking with a touch of nature. They're also relatively simple to make, especially if you follow a pre-designed plan.

  • Materials: You'll need plywood or cedar boards, a saw, screws, and a finish.
  • Tools: A saw, a drill, a screwdriver, a measuring tape, and a sander.

Choose a birdhouse design that you like, and cut the pieces to size. Then, use screws or glue to assemble the birdhouse. Make sure to leave a small opening for the birds to enter, and you're all set! You'll be happy to see those feathered friends moving in.

Beyond the Basics: Projects for the Adventurous

If you're ready to take your woodworking skills to the next level, here are some projects that will really challenge you and expand your knowledge of woodworking techniques.

7. Wooden Storage Bench: A Practical and Stylish Addition

Storage benches are a perfect combination of form and function. They provide seating and storage space, making them a versatile addition to any room.

  • Materials: You'll need plywood, lumber, screws, hinges, and a finish.
  • Tools: A saw, a drill, a sander, a screwdriver, and a measuring tape.

This project involves more complex cuts and joins, but it's a great way to learn about constructing furniture. You'll need to create a sturdy frame, add a seat, and incorporate storage compartments. Don't be afraid to experiment with different designs and styles!

8. Coffee Table: Elevate Your Living Room

Building a coffee table is a major woodworking project, but it's an incredibly rewarding one. You'll create a statement piece for your living room that you can be proud of.

  • Materials: You'll need lumber, plywood, screws, glue, and a finish.
  • Tools: A saw, a drill, a sander, a router, a screwdriver, and a measuring tape.

This project involves creating a sturdy frame, adding a tabletop, and perhaps incorporating drawers or shelves. You'll learn about different woodworking techniques, such as mortise and tenon joints or dovetail joints. The possibilities are endless, and the design is entirely up to you!

Tips for Success: Mastering the Craft

Here are a few tips to help you make the most of your woodworking journey:

  • Start small and simple: Don't get overwhelmed by complex projects. Begin with small and manageable projects to build confidence and develop your skills.
  • Practice makes perfect: Woodworking is all about practice. Don't be afraid to make mistakes; they're a natural part of the learning process.
  • Seek inspiration: Look for inspiration in woodworking books, magazines, or online tutorials. There's a whole world of ideas out there, waiting for you to discover them!
  • Don't be afraid to ask for help: If you're stuck or unsure about a technique, reach out to a more experienced woodworker. There's always someone who's happy to share their knowledge and help you succeed.
  • Most importantly, have fun! Woodworking is a creative and rewarding hobby. Enjoy the process and let your imagination run wild.

So there you have it â€" a guide to quick and easy woodworking projects that will help you kickstart your skills and create beautiful and functional pieces for your home or to give as gifts. Remember, the key is to start small, practice consistently, and most importantly, have fun! Happy woodworking!

Men's Jewelry Box: A Masculine and Functional Woodworking Project

Men's Jewelry Box: A Masculine and Functional Woodworking Project

Men's Jewelry Box: A Masculine and Functional Woodworking Project

For the discerning gentleman, a jewelry box isn't just a place to store valuables; it's a reflection of his style and sophistication. Crafting a bespoke jewelry box from wood offers a unique and personal touch, allowing you to tailor the design to your specific needs and aesthetic preferences. This article will guide you through the process of creating a masculine and functional jewelry box, perfect for storing watches, cufflinks, rings, and other treasured items.

Choosing the Right Wood

The choice of wood is paramount in setting the tone of your jewelry box. For a masculine and robust look, consider hardwoods like:

  • Walnut: Known for its rich, dark brown color and striking grain patterns, walnut exudes a sense of elegance and warmth.
  • Cherry: Possessing a reddish-brown hue that deepens with age, cherry adds a touch of classic sophistication.
  • Mahogany: A luxurious choice with a deep reddish-brown color, mahogany creates a timeless and sophisticated feel.
  • Oak: Sturdy and durable, oak boasts a distinctive grain pattern and comes in a variety of shades, from light to dark.

For a more contemporary style, consider using lighter woods like maple or ash. These woods can be stained to achieve a desired color and finish.

Design Considerations

Before diving into construction, carefully consider the design elements that will make your jewelry box both practical and aesthetically pleasing. Here are some key aspects to ponder:

Size and Shape

Determine the appropriate size for your collection and the available space where the box will be placed. A rectangular shape is a classic choice, but you can explore other options like a circular or octagonal design for a unique touch.

Compartments and Drawers

Consider the specific items you'll be storing and design compartments and drawers accordingly. For watches, you might include a padded tray or individual slots. For cufflinks and rings, small compartments or trays with felt lining will protect them from scratches.

Lid and Hinges

Choose a lid design that complements the overall style of the box. Consider adding a decorative inlay or carving. Use sturdy hinges that can withstand repeated opening and closing.

Hardware and Finishing Touches

Select hardware that complements the wood and design aesthetic. You can opt for simple brass or nickel hardware for a classic look, or explore more modern options like chrome or black metal. Consider adding a felt lining to the interior of the box for a luxurious touch and to protect your belongings.

Construction Process

Once you've finalized the design, you can begin construction. Here's a step-by-step guide to building your men's jewelry box:

Cutting and Shaping the Wood

Using a saw, cut the wood pieces to the desired dimensions. Carefully measure and mark the wood to ensure precise cuts. If you're creating a complex shape, use a jigsaw or band saw to achieve the desired contours.

Joining the Pieces

Join the wood pieces using a variety of methods, including:

  • Dovetail Joints: These traditional joints are strong and aesthetically pleasing, adding a touch of craftsmanship to the box.
  • Mortise and Tenon Joints: These strong joints are suitable for constructing drawers and other internal components.
  • Glue and Dowel Pins: These methods offer simplicity and strength, suitable for basic box construction.

Creating Compartments and Drawers

If you're incorporating compartments or drawers, construct them separately and then fit them into the main box structure. Use dovetail joints or rabbets to create sturdy and secure compartments.

Adding the Lid

Attach the lid to the box using sturdy hinges. Use screws or nails to secure the hinges, ensuring they are positioned evenly and securely. Consider using a piano hinge for a more elegant and smooth opening action.

Finishing and Refinishing

Once the box is assembled, you can apply a finish to enhance the appearance of the wood and protect it from wear and tear. Here are some common finishing techniques:

  • Sanding: Start with coarse sandpaper to remove any rough edges and then gradually move to finer grits for a smooth finish. This will create a uniform surface for applying the finish.
  • Staining: Stain the wood to achieve a desired color. Use a brush or rag to apply the stain evenly and let it dry completely before proceeding to the next step.
  • Varnishing or Polyurethane: Apply a clear finish like varnish or polyurethane to protect the wood and enhance its natural beauty. Apply multiple thin coats for optimal durability.
  • Waxing: Waxing provides a protective layer and adds a sheen to the wood. Use a soft cloth to apply the wax in thin layers and allow it to dry completely.

Adding Hardware and Interior Lining

Attach the hardware to the box and compartments. Use a screwdriver or drill to secure the hardware in place. Finally, line the interior of the box with felt or velvet for a luxurious touch and to protect your valuables.

Customization and Personalization

The beauty of crafting your own jewelry box lies in the ability to personalize it to your preferences. Consider these ideas to add a unique touch:

  • Engraving: Add a personalized touch with an engraved inscription on the lid or a plaque.
  • Inlay: Create a decorative inlay by inserting pieces of contrasting wood or other materials into the surface of the box.
  • Carving: Carve intricate designs or patterns into the wood to add visual interest.
  • Unique Shapes: Experiment with non-traditional shapes like a curved or rounded box for a modern and distinctive look.

Conclusion

Creating a men's jewelry box from wood is a rewarding project that combines craftsmanship, creativity, and personalization. By carefully selecting the right wood, considering your specific needs, and executing the construction process with precision, you can craft a functional and aesthetically pleasing piece that you'll cherish for years to come. Remember, the process itself is as enjoyable as the final product, allowing you to express your individuality and create a truly bespoke treasure.

Tuesday, November 12, 2024

Coffee Table Plans PDF: DIY Guide for Beginners

Coffee Table Plans PDF: DIY Guide for Beginners

Coffee Table Plans PDF: DIY Guide for Beginners

Building your own coffee table is a rewarding DIY project that can add a touch of personality and style to your living room. With detailed plans and a little bit of effort, you can create a stunning piece of furniture that you'll be proud to show off. This guide will walk you through the process of building a coffee table from scratch, providing step-by-step instructions for beginners.

Choosing the Right Coffee Table Plans

The first step is to find the perfect coffee table plans that fit your needs and skill level. There are countless options available online, ranging from simple and minimalist designs to more elaborate and intricate creations. Consider the following factors when choosing your plans:

Style and Design

Think about the overall style of your living room and choose plans that complement your existing furniture and decor. Do you prefer a modern, rustic, or traditional look?

Size and Dimensions

Measure the space where you plan to place the coffee table and choose plans that fit comfortably. Also, consider the height of your sofas and armchairs to ensure a comfortable seating arrangement.

Materials

The plans should specify the materials you'll need, including wood types, hardware, and finishing supplies. Choose materials that align with your budget and aesthetic preferences.

Skill Level

Choose plans that match your woodworking experience. If you're a beginner, start with a simpler design. As you gain confidence, you can move on to more complex projects.

Gathering the Necessary Tools and Materials

Once you've selected your plans, gather all the necessary tools and materials. This includes:

  • Woodworking tools (saw, drill, sander, etc.)
  • Measuring tools (tape measure, ruler, square)
  • Fasteners (screws, nails, glue)
  • Wood (depending on the plans)
  • Finishing supplies (stain, paint, varnish)
  • Safety gear (eye protection, gloves, dust mask)

Ensure that you have all the necessary tools and materials before starting the project. This will save you time and frustration in the long run.

Step-by-Step Construction Guide

The coffee table plans will provide detailed instructions for each step of the construction process. Follow the plans carefully, paying close attention to dimensions and assembly techniques. Here's a general overview of the typical steps:

Cutting the Wood

Use a saw to cut the wood according to the plan dimensions. Be sure to make precise cuts to ensure that all the pieces fit together properly.

Assembling the Frame

Join the wood pieces together to create the frame of the coffee table. Use glue and screws for a strong and durable connection.

Adding the Top

Attach the table top to the frame. Ensure the top is level and centered. You may need to make adjustments to ensure proper fit.

Sanding and Finishing

Sand the entire surface of the coffee table to create a smooth finish. Then, apply stain, paint, or varnish as desired. This will protect the wood and enhance its appearance.

Tips for Beginners

Building a coffee table can be a challenging but rewarding experience. Here are some tips for beginners to ensure a successful project:

  • Take your time and don't rush. Accuracy and precision are key to creating a beautiful coffee table.
  • Read the plans carefully and understand each step before starting. This will prevent mistakes and frustration.
  • Use quality tools and materials. This will contribute to a more durable and attractive coffee table.
  • Don't be afraid to ask for help. If you encounter any difficulties, reach out to experienced woodworkers or online resources for assistance.

With a little patience, effort, and the right plans, you can build a stunning coffee table that will be the envy of your friends and family.

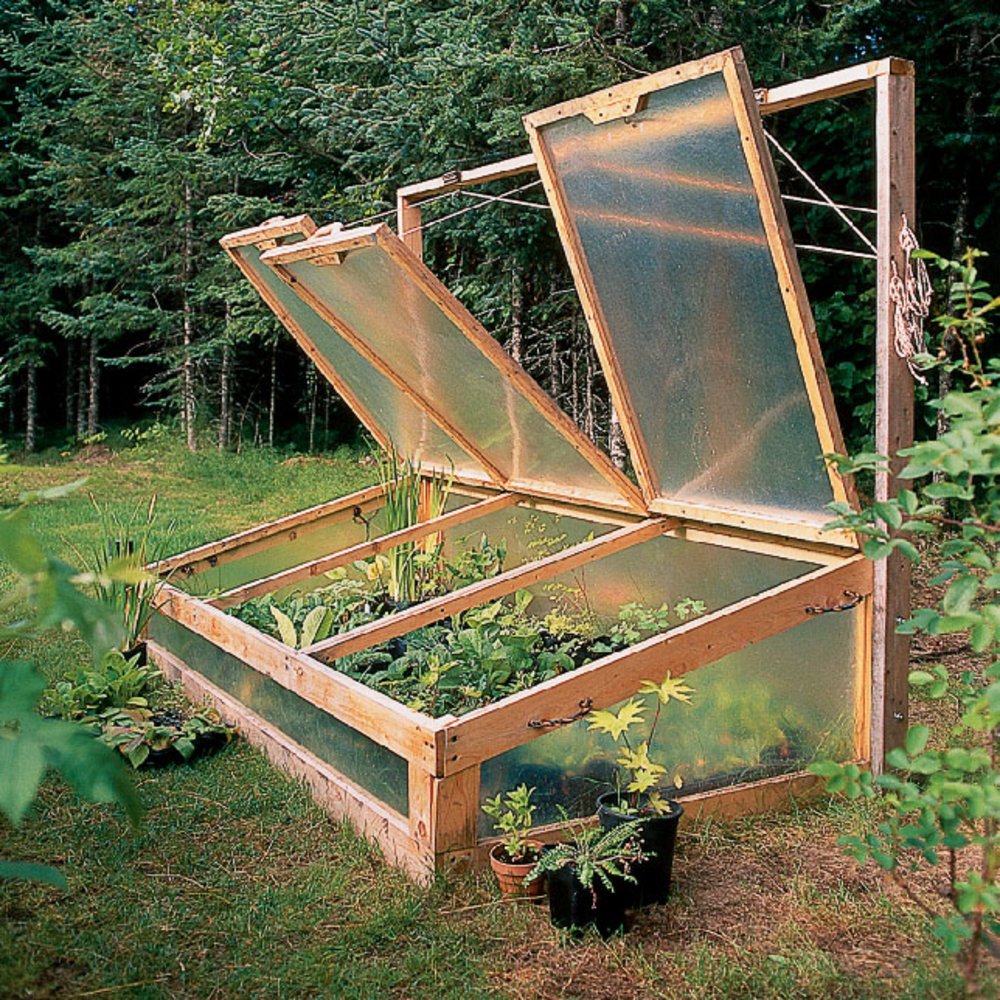
How to Build a Cold Frame: Free Plans

How to Build a Cold Frame: Free Plans

Building a Cold Frame: Free Plans for an Easy DIY Project

Hey there, gardening enthusiasts! Are you itching to get a head start on the growing season but worried about the unpredictable weather? A cold frame is your solution. It's basically a mini greenhouse that allows you to extend your growing season and even start seeds earlier in the spring. And the best part? You can build one yourself for a fraction of the cost of a store-bought one.

Let's face it, building a cold frame isn't rocket science. It's a relatively straightforward project that even a beginner DIYer can handle. In this guide, we'll walk you through the process step-by-step, with free plans and tips for success. You'll be surprised at how easy it is to create your own mini greenhouse!

Benefits of Building a Cold Frame

Before we dive into the construction details, let's talk about why a cold frame is such a fantastic tool for gardeners of all levels:

  • Extend your growing season: Protect your plants from frost and cold temperatures, allowing you to start planting earlier in spring and keep your garden thriving later into fall.
  • Start seeds indoors: Create a controlled environment for starting seeds before it's warm enough to plant them directly in the garden. This will give your seedlings a head start.
  • Hardening off seedlings: Before you transplant your seedlings into the garden, a cold frame provides a gradual acclimation period to outdoor conditions, helping them adjust to the change.
  • Overwintering plants: Preserve delicate plants during the winter by providing a protected environment.
  • Save money: Building your own cold frame is much more affordable than buying one pre-made.
  • DIY satisfaction: There's something incredibly rewarding about building something yourself that helps you grow your own food.

Cold Frame Design: Choosing the Right Size and Materials

First things first, let's talk about design. You have a lot of flexibility here, so let your needs and available materials guide you.

Size

The size of your cold frame will depend on how much space you have and what you plan to grow. Here are some general guidelines:

  • Small cold frame (3-4 feet long): Perfect for starting seeds, overwintering small plants, or hardening off seedlings.
  • Medium cold frame (5-6 feet long): Ideal for a larger collection of seedlings or overwintering a variety of plants.
  • Large cold frame (8-10 feet long): Suitable for growing larger vegetables, such as lettuce, kale, or spinach, throughout the year.

Materials

For a simple and affordable cold frame, consider these materials:

  • Base:
    • Wood: Pressure-treated lumber is a good choice for durability and resistance to moisture. Consider using 2x4s or 2x6s.
    • Concrete blocks: They provide a sturdy base and can be easily arranged in various sizes and shapes.
    • Old window frames: Repurpose old window frames for a charming and sustainable cold frame.
  • Sides:
    • Clear polycarbonate sheets: Lightweight, durable, and excellent for transmitting light.
    • Glass: Offers good insulation, but it can be heavy and breakable.
    • Old windows: Repurpose old windows for a vintage look.
  • Top:
    • Hinged lid: For easy access and ventilation, use hinges to attach the top to the sides.
    • Sliding lid: Allows for adjustable ventilation and easy access to plants.

Free Cold Frame Plans

Let's get down to business! Here's a simple and easy-to-follow plan for building a cold frame:

Materials:

  • 8 pieces of 2x4 lumber, 4 feet long (for the base)
  • 2 pieces of 2x4 lumber, 3 feet long (for the sides)
  • 1 piece of clear polycarbonate sheet, 4 feet x 6 feet
  • 4 hinges
  • 2 handles
  • Screws or nails
  • Weather stripping (optional)

Tools:

  • Saw
  • Drill
  • Screwdriver or hammer
  • Measuring tape
  • Level

Instructions:

  1. Build the base: Cut the 2x4 lumber to create a square or rectangular frame, depending on the size of your cold frame. You'll need four pieces of 2x4 for each side. Attach them using screws or nails to make a sturdy base.
  2. Attach the sides: Cut the 2x4 lumber to the desired height for the sides of your cold frame. Attach them to the base using screws or nails. Ensure that the sides are straight and perpendicular to the base.
  3. Cut and install the polycarbonate sheet: Measure the sides of your cold frame and cut the polycarbonate sheet to fit. You might need to trim it slightly for a perfect fit. Use screws or nails to attach the polycarbonate sheet to the sides of the cold frame.
  4. Make the lid: Cut another piece of polycarbonate sheet to size for the lid. Attach the hinges to the lid using screws or nails. Then, attach the lid to the sides of the cold frame. You can add handles to the lid for easier opening and closing.
  5. Optional: Add weather stripping: For a more sealed and insulated cold frame, apply weather stripping around the edges of the lid and sides. This will help to prevent drafts and maintain a warmer temperature inside.
  6. Place your cold frame: Choose a sunny spot in your garden and place the cold frame on level ground.
  7. Cold Frame Maintenance: Keeping It in Tip-Top Shape

    Once your cold frame is built, you'll want to keep it in good shape. This will extend its lifespan and ensure it performs its best.

    • Ventilate regularly: Open the lid or vents to regulate the temperature inside, especially on warm days. Avoid letting the temperature get too high, which can harm your plants.
    • Clean regularly: Clean your cold frame periodically to remove dirt, debris, and pests. Wash the polycarbonate or glass panels with soapy water to remove any grime.
    • Check for leaks: Inspect the cold frame for any leaks in the sides or lid. If you find any, repair them promptly to maintain a warm and dry environment.
    • Protect from snow: During heavy snowfalls, remove snow from the lid to prevent it from collapsing under the weight.

    Tips for Using a Cold Frame

    Now that you've built your cold frame, here are some tips for maximizing its potential:

    • Choose the right plants: Some plants are well-suited for cold frames, while others aren't. Consider crops like lettuce, spinach, kale, carrots, radishes, and broccoli for starting earlier in the season.
    • Prepare the soil: Use a good-quality potting mix or a mixture of soil, compost, and peat moss. Make sure to fertilize the soil to provide nutrients for your plants.
    • Monitor the temperature: A simple thermometer will help you track the temperature inside your cold frame and adjust ventilation accordingly.
    • Water regularly: Keep the soil evenly moist, but avoid overwatering, which can lead to root rot.
    • Control pests: Use row covers or netting to protect your plants from insects, and consider using organic pest control methods.

    There you have it! Building a cold frame is a rewarding project that can give you a head start on the growing season and extend it well into fall. With these free plans and tips, you can easily create your own mini greenhouse and enjoy fresh, homegrown produce for months to come. Happy gardening!